How Much Does It Cost To Sand My Floor

So here is the million dollar question: how much does it cost to sand a floor? To help you get an idea of what you should be expecting, I have listed some examples of recent floor sanding work we have completed, along with the associated costs involved. There are several factors to take into account when costing a job, such as how long it is expected to take, if there are gaps to fill and the quantity of materials we may need. Therefore, the following information should be used as a guide only.

Likely Minimum Charges:

(1) Hallway of 9 square metres of finger block parquet (basket weave) straight sanding, no repairs, resin filled with a clear matt lacquer finish. £580 including vat

(2) Hallway of 16 square metres, engineered oak, straight sanding with no repairs and finished with ultra matt lacquer £580 including vat.

(3) Open plan lounge and dining room area of 20 square metres of engineered oak with no repairs, straight sanding with no repairs and finished with matt lacquer £595 including vat.

Again please note the above prices are only a guide and should not be taken as indicative for your own floor sanding requirements. Prices do vary from job to job.

Our basic charge is £28 plus VAT per square metre for sanding and finishing (staining will be more expensive). In most cases, the minimum cost is a days charge of £580 including VAT.  Most of the time we work in a team of 2. It’s worth bearing in mind that the smaller the area, the more expensive the job works out per square metre. For example small hallways or bathrooms will be the most expensive areas to sand and finish.

To give some context to these prices, hiring a low range belt and edge sander for a day is likely to cost approximately £150. These two machines on their own won’t give a great finish as they lack the finesse and control that professional machines have. Ideally you’ll need to go around the edges with a lighter weight machine to remove all the scratches, as well as getting into the tight corners. If you simply use a belt sander for the main floor area, you’ll end up with a very poor quality surface. It’s also worth considering what you want to finish the floor with. For up to 16 square metres of floor, a 5 litre tub of lacquer finish should be sufficient, which will cost around £100.

One person, with limited (or no) experience in floor sanding is likely to be able to sand around 16 square meters of floor in one day with standard hire tools and the quality of these tools means that they’re also likely to create a significant amount of dust in the process. So after one day, you’ll have spent £250 in sander hire and materials at a minimum (depending on whether you needed to invest in hiring a corner sander or buying dust sheets as well). Your back hurts, the quality isn’t great, your house is full of dust and you quite possibly wish you had never started! In a worst case scenario, you might even have to call a professional to fix any damage that’s been caused. We’ve seen all too many floors that end up looking terrible because someone has “had a go” and sanded it themselves. In my experience, it really is worth the investment to get a professional in to finish your floors as this can make a significant difference to the quality of the room.

It really does come down to what your time is worth and how good you want your floors to look and how much time, effort and hassle you are prepared to go through.

If you would like any further information on our floor sanding process, or would like to book in for a free quote, then feel free to get in touch and we will be happy to help.


For any more help and advice please feel free to call us on 01962 733016 or email info@winchesterwoodfloors.co.uk and we can get your flooring project off the ground today!

Lorem ipsum dolor sit amet, consectetur adipiscing elit. Ut elit tellus, luctus nec ullamcorper mattis, pulvinar dapibus leo.

What is Winchester Wood Floors Sanding Process and How Long Does it Take?

So you may have read our series of blogs explaining the processes behind floor sanding, but what is our floor sanding process and how long does it take? What is our methodology and what sets us apart?

Historically, sanding wooden floors has been an extremely dusty task, with rooms having to be decorated after floor sanding has been completed, due to the sheer amount of dust being kicked up and getting in every nook and cranny of the room. These days however, through a combination of modern machinery and dust extractors, very little dust is generated during the sanding process, provided you’re using the right kit. It can be costly to buy or hire the right kit, and needs a degree of expertise and experience to use it correctly for the best results.

Commercial Floor Sanding by Alresford InteriorsAt Winchester Wood Floors, our tools of choice are from Lagler, Festool and Fein. Specifically, the Lagler Flip, Hummel and Trio, the Festool RO150 and RO90 and the Fein Multi master. These machines are used by many professional floor sanding companies and either carry dust free classifications or are plugged into dust extractors, reducing the level of dust to virtually zero. Quite often we will see clients standing in the doorways of the rooms we are working on, in disbelief at how dust free the room is from start to finish.

As a rule when starting a floor sanding job the room needs to be completely empty. This includes all furniture and hanging pictures, and curtains are either to be removed or tied back out of harm’s way. We then thoroughly sweep the floor clear of all debris, then vacuum it to ensure it’s completely clear. We take great care in ensuring all possible dirt, debris and grime is completely removed before sanding, as this could cause marks and scratches on your floor if missed. Once clean, we ensure all nails and tacks are either removed or punched under the surface to prevent any damage being done to both your floor and our machines. After every change of grit, we vacuum the floor again to ensure the floors remain completely clean throughout the entire process. Whilst this may seem time consuming and labour intensive, the high standard of finish this creates speaks for itself.

Once we’ve prepped your floor, we use the a Lagler Hummel belt sander for the main floor area. The right grit selection is important; it needs to be coarse enough to remove all traces of the old finish, but not too coarse as this would add in additional processes, wasting time unnecessarily. There’s no one-size-fits-all starting point for grit selection, so we use our experience to determine which would be best for your floor, based on wood type, condition, wear, existing finish and other factors.

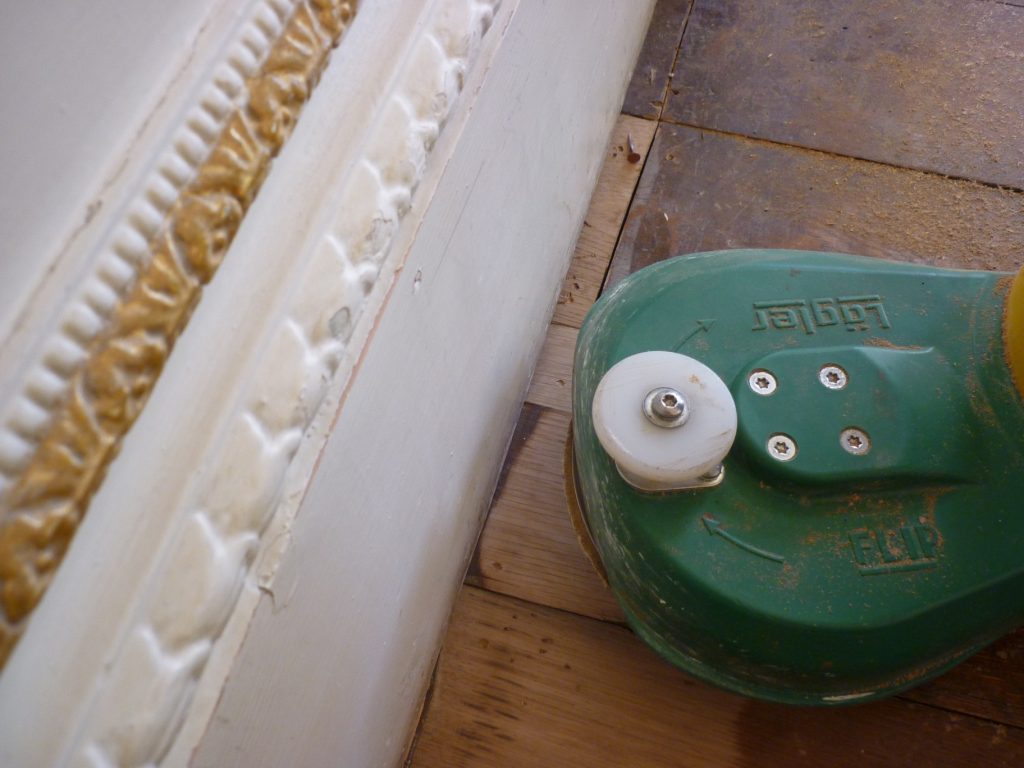
After each level of grit we apply to the main body of the floor, we then carefully sand the floor edges with the Lagler FLIP edging sander, ensuring they’re blended perfectly at each stage of sanding. When the floor has been sanded up to 60 grit, we use the Lagler Trio finishing sander to get a fine and completely smooth finish, then the Festool Rotex for a final sand around the edges of the room to remove any small scratches that may have been left by the Lagler FLIP. Finally, we sand and blend the edges of the floor to match the rest, making one seamless piece. By using so many specialised sanders for each area of the floor, we’re able to create a much higher quality finish than could ever be achieved by one or two hire sanders alone. If you want more detailed information on how we sand the wood around the corners and edges of a floor, check out our blog posts: ‘How to Sand Edges of a Floor’ and ‘How to Sand Corners of a Floor’.

The time we take can vary hugely from project to project, based on a huge number of factors. For example, an old, poorly varnished, damaged pine floor that would require thorough cleaning and gap filling would take far longer than an engineered oak floor that’s only 10 years old and fairly clean. Paradoxically, larger rooms can often be quicker to complete. It’s surprising how much more can be done in one large square room, rather than in two small rooms, or a small hall. The smaller and fiddlier the job is proportionally, the longer it will take. As an example, between a team of two we have had a 120 square meter community hall sanded and finished in two days, but a small hall lounge and dining room of 30 square meters could take two to three days. Typically, a domestic job of approximately 20 square meters that is straight forward should be sanded and finished in one day. But if lots of repairs are required, or if the floor is thick with an old finish, it could take as much as three.

Due to the highly job-specific nature of these timescales, we always conduct a home visit for every customer to evaluate the scope of the job and any additional processes that may need to be completed. All of these quotes are completely free and no obligation, and give us a chance to assess exactly how long it would take to complete your job, based on the factors listed above.

If you would like any further information on our floor sanding process, or would like to book in for a free quote, then feel free to get in touch and we will be happy to help.


For any more help and advice please feel free to call us on 01962 733016 or email info@winchesterwoodfloors.co.uk and we can get your flooring project off the ground today! 

How to Sand Edges of a Floor

Sanding the edges of wooden floors - Winchester Wood FloorsIf you’re thinking about floor sanding, questions are probably going to start to surface about how to sand right up to the edges, and whether the sanding is going to damage the skirting boards or not.

This article will address these common questions and shed some light on the machinery and tools we use to get the job done.

When considering the process of sanding a floor, it is important to remember that the edges of the room will need to be blended with the main body of the floor. So for example, when the main body of the floor has been sanded with a 40 grit paper (the most common starting grit), then the edges will also need to be sanded with a 40 grit. This will need to be repeated with each in the series of grits, or we run the risk of having a visible difference between the centre and edges of your flooring. We continue this cycle until reaching 100 grit paper.

Always remember to thoroughly vacuum before each grit change as any grime or dirt which is not removed will be ground into the floor when the next level of grit is applied, causing scratches to the wood that can be easily avoided. It sounds like a tedious and labour-intensive task, but the difference in result is more than worth the additional effort.

Once we have ensured all scratches are removed for a fine finish, we then go over the entire floor once more using a 100 grit, before finishing with the final step in the process: sanding  the corners. You can see more detailed information on this complex aspect by reading our post: ‘How to Sand Corners of a Floor’.

Our edge sander of choice is called the Lagler FLIP. It’s fairly light in weight (thanks to it’s highly durable glass-fibre reinforced plastic used in the motor casing, handle and attachment), very powerful, surprisingly easy to use, and (like the rest of our machinery) is virtually dust free! Like all Lagler machines, the FLIP has been designed down to the last detail with ergonomics, simple handling and maintenance in mind and can be easily applied to a variety of edge sanding requirements with its selection of additional attachments. The FLIP is also the first Wood Dust Certified edge sander in the world, with dust emissions at less than 1mg per m3 ensuring a safe working environment and making it our edger of choice.

The Lagler FLIP is designed to sand to the very edges of the floor, and has a small wheel which runs along the skirting board to protect it. That being said, no tool is completely perfect, so on occasion it can still be possible to clip the skirting board with the edge of the machine, leaving a small mark.

As we always use machines that are virtually dust free, we always advise our clients to have all their decorating work done before sanding commences. Occasionally the paintwork on the skirting boards may need a slight touch up, but this is far easier to do than risk getting paint on a freshly sanded floor (and potentially having to call a professional back in to re-sand areas that have been splashed by paint. An all too common occurrence). If you’ve chosen to sand your own floors, or are using decorators that don’t use dust-free machinery, then you’ll need to weigh up the difficulty of doing this on a case-by-case basis.

If you’d like to know more, or have any questions about anything floor-sanding related, please feel free to contact us.


For any more help and advice please feel free to call us on 01962 733016 or email info@winchesterwoodfloors.co.uk and we can get your flooring project off the ground today! 

How to Sand a Floor by Hand

Sanding your own floor is no easy feat, especially if you lack the right gear and expertise. Before we start, I recommend you read ‘Can I sand my own floor’ – a quick go-to guide of the things to think about when sanding your own floor. It’s a crazy undertaking to sand a floor without the use of a floor sander and even then, there are good and bad floor sanders. Combining a bad sander and an amateur is a recipe for disaster. My hat comes off to anyone who is prepared to undertake sanding a floor by hand without the right kit!

I have endeavoured to compile a list of hand sanders below, explaining the benefits and uses of each.

1. The Delta/Corner sander is probably the least used sander within the kit. That said, it certainly has its uses as it will get right into the corners, edges and other awkward little areas that others might be unable to reach.

2. The Orbital sander, often referred to as a finishing sander, is great for a fine finish, but is unsuitable for sanding an entire floor from start to finish by itself.

3. The Random Orbital sander does not generally have as much speed as a belt sander, but is easier to control and will leave a better finished surface. However, if used for removing the finish of a floor, it will take a considerable amount of time.

4. The hand-held belt sander has far more power than those mentioned previously. Due to their power, they can cut through dents and scratches and remove old finish from a room far quicker than the rest. It is important to keep the sander moving at all times in order to avoid digging into the wood.

5. Festool Rotex – many years ago I discovered this bad boy sander, but could not get my head around the cost. I remember thinking ‘why is it so expensive?’. But then I tried it and its performance and power was unbelievable. It has two settings, each with different speeds. It oscillates spins, and possesses a huge amount of force that will cut through the grimiest of floors with ease. This sander can produce a very fine finish and plugged into an extractor it will leave virtually no dust.

The process for sanding a floor by hand would be, as a general rule, to start on a 40 grit sandpaper and work your way up to 100 or 120 grit paper to leave a fine finish. It is important to keep any sander moving so it does not dig into or burn the floor. Make sure that all the old finish is completely removed, or it will look awful when the fresh finish is applied. It is vitally important that the floor is thoroughly vacuumed before the finish is applied.

Sanding a floor by hand is like everything in life – the better the tools the easier the job. We have the best Lagler floor sanders, Edgers, Festool sanders and dust extractors money can buy which makes the job far less laborious and produces a far better finish.

Trying to sand a floor by hand is a big no no in my book. Even with a Festool Rotex, which is about the best hand sander you can get, it will still take ages and the results of the job will be compromised. Get yourself a floor sander, or better still hire a pro.

For any more help and advice please feel free to call us on 01962 733016 or email info@winchesterwoodfloors.co.uk and we can get your flooring project off the ground today! 

Can I Sand My Own Floor?

Alresford Interiors Floor SandingA common question we get asked is “Can I sand my own floor”? The simple answer is, yes DIY, you can sand your own floor, but there are several factors to consider before you start. It can be an exciting prospect to take on a home project, and if you have the time, skill and equipment to hand, it can also make a small saving in cost.

Here are three key points to consider if you’re thinking of trying this at home:

Equipment:

It’s important to ensure you’re using quality, up-to-date equipment for the best results. At Winchester Wood Floors, our tools of choice are from Lagler, Festool and Fein. Specifically, the Lagler Flip, Hummel and Trio, the Festool RO150 and RO90 and the Fein Multi master. These machines are used by many professional floor sanding companies and either carry dust free classifications or are plugged into dust extractors, reducing the level of dust to virtually zero.

Many hire machines, even those described as ‘high performance’ or ‘high quality’, are often not up to standard and can quickly clog the room up with dust. Standard belt sanders are not only heavy and difficult to handle, but can only travel up and down your floor, whereas professional sanding equipment can also travel across the room, ensuring the whole sanding and finish process will be even and level. These are important factors to consider when choosing the right tool for the job.

Experience:

As with all skills, the more you do something, the better you become at it. A floor sander may look easy to use at first glance (after all, they’re just being moved up and down a room, right?), but it is vital to keep an even pressure and perfectly straight lines to ensure a quality finish. An even pressure is crucially important due to the wear layer on your floor boards. If you have an engineered wood floor, then you potentially have a 4-6mm wear layer, so mistakes in pressure distribution can reduce the floors lifespan drastically. If mistakes are made during attempted DIY and a professional floor sander is then called in afterwards, they would have to access what wear layer is left, if any, before being able to commence work.

Dusting the sanded surface thoroughly before applying a finish is also vitally important. Whilst this sounds like a case of simply bunging a vacuum cleaner around and hoping for the best, a standard home vacuum is liable to leave drag marks and leftover dust on the floor surface, especially around awkward corners and edges, which will then be permanently trapped beneath the finish you use. It’s important to have not only the right kit for the job, but the expertise to use it effectively.

Cost:

When you weigh up the costs of hire machinery and floor finish, you will undoubtedly save money, but in the grand scheme of things, what you do save cost wise will be offset against what it looks like. If mistakes do happen, you would then have to factor in the costs of having to employ a professional to remedy the floor. If the wear layer has been badly compromised then a new floor may be your only option. We have seen and helped rectify many homes where people have taken on the challenge of sanding their own floors and unfortunately made mistakes in the attempt.

It is for these key reasons we wholeheartedly recommend calling in the professionals to help refurbish your flooring, however, if you still want to take on the challenge, take a look at our ‘How To’ blog on DIY floor sanding.


For any more help and advice please feel free to call us on 01962 733016 or email info@winchesterwoodfloors.co.uk and we can get your flooring project off the ground today!